User Authentication with Rails and Backbone.js
Backbone.js is a small framework for developing web apps. Since there are no guiding conventions it can sometimes be difficult for the beginner to understand what is going on. The early contributors have different ideas of how things should be done. The community is still young, but over time sources for beginners will grow.
Backbone.js is used for almost all JavaScript front end development at 42Floors. One of the first problems that most web apps will encounter is creating and authenticating users. The following is our solution to this problem and is used with several of our internal tools.
Before we begin be sure you have Ruby and Ruby on Rails installed. If you are on a Mac, follow these instructions to get everything you need installed. You do not need to install MySQL because we will be using SQLite for this tutorial.
At 42Floors we have an internal MLS
(a database of available listings) for managing listings and properties. Let's
start by creating a Rails app named MLS.
Bring up the Terminal and cd to the directory which you want to create the
app in. For me, I keep all my code that I'm working on in a directory named
src, so I'm going to cd ~/src.
$ cd ~/src
$ rails new MLS
The rails new MLS will generate an app named MLS in a directory called MLS.
After creating the app set your current working directory to ~/src/MLS by
cd into it.
$ cd MLS
Next create the User model that will be the basis for any account in our
system.
$ rails generate model user
The rails generate model user command will create a migration
file in db/migrations and a file in app/models along with a few others.
Open up the migration file using a text editor of your choice (TextMate in
this case).
$ mate db/migrate/20120411200952_create_users.rb
You're migration file will have a different set of numbers at the beginning of the filename. This is just a timestamp to help differentiate between conflicting migration files. Update the file to include the added fields so it looks like the following:
class CreateUsers < ActiveRecord::Migration
  def change
    create_table :users do |t|
      t.string  :name,  :null => false
      t.string  :email, :null => false
      t.string  :phone
      t.string  :company
      t.string  :title
      t.string  :license_id
      t.string  :linkedin
      t.string  :twitter
      t.string  :facebook
      t.string  :web
      t.string  :password_digest, :null => false

      t.timestamps
    end
  end
end
After we run this migration a user will have to have the name, email, and
password_digest, otherwise the user will not be created in the database. The
:null => false tells the database to reject an insert if any of the fields
specified are null. Next we will also add this validation to the Rails
app as well. The password_digest field is where we will store the encrypted
password.
Save the file and then open app/models/user.rb.
$ mate app/models/user.rb
Update the file to contain the following validations and methods.
class User < ActiveRecord::Base

  attr_accessor :password
  attr_protected :password_digest

  validates :name, :presence => true
  validates :email, :presence => true, :uniqueness => true, :email => true
  validates :password, :presence => true, :confirmation => true
  validates :password_confirmation, :presence => { :if => :password }
  validates :phone, :format => { :allow_nil => true, :with => /^[\(\)0-9\- \+\.]{10,20}\s*[extension\.]{0,9}\s*[0-9]{0,5}$/i }

  def password=(pass)
    return if pass.blank?
    @password = pass
    self.password_digest = BCrypt::Password.create(pass)
  end

end
The attr_accessor :password specifies a virtual attribute
name password. We won't be storing the password in plaintext, but we do need
to know what it is when the user is being created so we can encrypt it. The
password= method will be encrypt the password with bcrypt
and store the encrypted password in the password_digest field.
The validations make sure that the require fields are present and are the
correct format if necessary. The :presence => true ensures an attribute is
not null, :confirmation => true in this case ensures that password matches
password_confirmation, the :format on the phone makes sure it matches the
give regex if it is not
null, and the :email => true validates that the email looks like a real
email address.
Using the bcrypt and email validation functionality requires use of both the
bcrypt-ruby and the email_validator
gems. Open up the Gemfile to add these dependencies to our application.
$ mate Gemfile
The Gemfile should look like this after adding these gems:
source 'https://rubygems.org'

gem 'rails', '3.2.3'

# Bundle edge Rails instead:
# gem 'rails', :git => 'git://github.com/rails/rails.git'

gem 'sqlite3'
gem 'bcrypt-ruby', :require => 'bcrypt'
gem 'email_validator'

# Gems used only for assets and not required
# in production environments by default.
group :assets do
  gem 'sass-rails',   '~> 3.2.3'
  gem 'coffee-rails', '~> 3.2.1'

  # See https://github.com/sstephenson/execjs#readme for more supported runtimes
  # gem 'therubyracer', :platform => :ruby

  gem 'uglifier', '>= 1.0.3'
end

gem 'jquery-rails'

# To use ActiveModel has_secure_password
# gem 'bcrypt-ruby', '~> 3.0.0'

# To use Jbuilder templates for JSON
# gem 'jbuilder'

# Use unicorn as the app server
# gem 'unicorn'

# Deploy with Capistrano
# gem 'capistrano'

# To use debugger
# gem 'ruby-debug19', :require => 'ruby-debug'
Rails uses Bundler as its dependency manager. We now
have to run the bundle command to update all the gems for our Rails app.
$ bundle
Now lets migrate our database to add the users table.
$ rake db:migrate
Now we have the ability to create users. Lets try it and make sure it works. Bring up the Rails console.
$ rails console
>> u = User.new(:name => 'James', :email => 'james@42floors.com')
>> u.save
=> false
Doesn't look like it worked. Lets take a look at the errors on the user.
>> u.errors.to_a
=> ["Password can't be blank"]
Forgot to set the password, lets set it and the password_confirmation now.
>> u.password = 'test'
>> u.password_confirmation = 'test'
>> u.save
=> true
Great, looks like its working. In the next step we will build the controller. After that we will start updating the views and working with Backbone.js.
Exit the Rails console if you are still in it. Then generate the controller.
>> exit
$ rails generate controller users
Open up the UsersController.
$ mate app/controllers/users_controller.rb
Update the file:
class UsersController < ApplicationController

  respond_to :html, :json

  def new
    @user = User.new
  end

  def create
    @user = User.new(params[:user])

    if @user.save
      flash[:notice] = 'Account created.'
    end
    respond_with @user, :location => '/'
  end

end
The respond_to :html, :json specifies that this controller will respond to
both HTML and
JSON. The new action will render a form for the user
to fill out and the create action will receive a POST request and send.
The next step is to setup the routes so that the URLs /signup and /account/new
route to the new action and the route /account routes to the create
action. Open up the config/routes.rb and update the routes:
MLS::Application.routes.draw do

  match 'signup' => 'users#new', :via => :get

  resource :account, :controller => 'users', :only => [:new, :create]

end
By default resource will include the index, show, new, edit,
create and destroy methods. The :only => [:new, :create] says that we
only want the new and create actions. You can learn more about routing
here.
That pretty much wraps up all the Rails work we are going to be doing for user accounts. Now we need to complete the views and integrate Backbone.js.
Before we go any further lets add Backbone.js, Underscore.js and the Rails
Backbone.js extension. I keep any libraries like jQuery, Backbone.js and
Underscore.js under the lib/assets/javascripts directory since they don't
contain any application logic. We will need to create this directory first
before adding the files.
$ mkdir lib/assets/javascripts
Now just download the files:
$ curl http://documentcloud.github.com/backbone/backbone.js > lib/assets/javascripts/backbone.js
$ curl http://documentcloud.github.com/underscore/underscore.js > lib/assets/javascripts/underscore.js
$ curl https://raw.github.com/codebrew/backbone-rails/master/vendor/assets/javascripts/backbone_rails_sync.js > lib/assets/javascripts/backbone_rails_sync.js
app/assets/javascripts/application.js needs to be updated to include these
files so our client side code will have access to Backbone.js.
$ mate app/assets/javascripts/application.js
The file should look like the following:
//= require jquery
//= require jquery_ujs
//= require underscore
//= require backbone
//= require backbone_rails_sync
There are two views that we are going to need to create. First is the signup
form (the url /signup or /account/new) and the second it the login
(/account). Create new.html.erb and open it.
$ mate app/views/users/new.html.erb
Now we'll add the form for creating the user.
<div id='signup-view'>
  <div class="page-header">
    <h1>42Floors <small>MLS</small></h1>
  </div>

  <%= form_tag account_path, :class => 'form-horizontal' do %>
    <div class="control-group">
      <%= label_tag :name, nil, :class => 'control-label' %>
      <div class="controls">
        <%= text_field_tag :name, nil, :placeholder => 'Robert A. Jones' %>
      </div>
    </div>

    <div class="control-group">
      <%= label_tag :email, nil, :class => 'control-label' %>
      <div class="controls">
        <%= text_field_tag :email, nil, :placeholder => 'robert@example.com' %>
      </div>
    </div>

    <div class="control-group">
      <%= label_tag :password, nil, :class => 'control-label' %>
      <div class="controls">
        <%= password_field_tag :password %>
      </div>
    </div>

    <div class="control-group">
      <%= label_tag :password_confirmation, 'Confirm', :class => 'control-label' %>
      <div class="controls">
        <%= password_field_tag :password_confirmation %>
      </div>
    </div>

    <div class="form-actions">
      <%= submit_tag "Signup", :class => 'btn btn-primary' %>
      <div class='clear'></div>
    </div>

  <% end %>
  <div class='clear'></div>
</div>
If you start the rails server
using rails server you should see the following when you go to http://localhost:3000/signup
Lets add some styling to this. Open app/assets/stylesheets/users.css.scss
and add the following CSS.
#signup-view {
  width: 470px;
  margin: 0 auto;
  -webkit-border-radius: 5px;
  -moz-border-radius: 5px;
  -ms-border-radius: 5px;
  -o-border-radius: 5px;
  border-radius: 5px;
  -webkit-box-shadow: 0px 1px 5px rgba(0, 0, 0, 0.2);
  -moz-box-shadow: 0px 1px 5px rgba(0, 0, 0, 0.2);
  box-shadow: 0px 1px 5px rgba(0, 0, 0, 0.2);
  background: #FFF;

  .page-header {
    padding: 18px 1em;
    margin: 0 0 18px 0;
    border-bottom: 1px solid #EEE;

    h1 { margin: 0; padding: 0; }
    small { font-weight: normal; color: #999; }
  }

  label {
    float: left;
    width: 140px;
    padding-top: 5px;
    text-align: right;
  }

  .control-group {
    margin-bottom: 18px;
  }
  .controls { margin-left: 160px; }

  input[type=text], input[type=password] { width: 280px; }
  input[type=submit] { display: inline-block; float: right; }

  .form-actions {
    padding: 17px 20px 18px;
    margin-top: 18px;
    margin-bottom: 18px;
    background-color: #EEE;
    border-top: 1px solid #DDD;
  }
}

.clear { clear: both; }
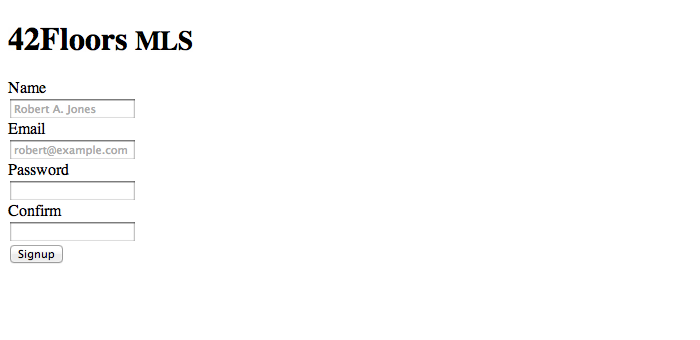
Save this file and then take a look at http://localhost:3000/signup. The
page should look like the image below.

Now lets start creating the first Backbone.js view, SignupView. I like to
keep my javascript files organized under the app/assets/javascripts
directory similar to how Rails organizes its controllers, views, and models
under the app/ directory. Create the folders models and views in
app/assets/javascripts.
$ mkdir app/assets/javascripts/models
$ mkdir app/assets/javascripts/views
Create the signupView.js file and open it for editing.
$ mate app/assets/javascripts/views/signupView.js
Update the file to define our view:
SignupView = Backbone.View.extend({
  el: '#signup-view',

  initialize: function () {
    this.form = this.$el.find('form');
    this.nameField = this.$el.find('input[name=name]');
    this.emailField = this.$el.find('input[name=email]');
    this.passwordField = this.$el.find('input[name=password]');
    this.passwordConfirmationField = this.$el.find('input[name=password_confirmation]');
    this.submitButton = this.$el.find('input[type=submit]');
  },

});
The el is the DOM element that the view will attach to. Whenever we create
the view the initialize function will get called. In the initialize
function I just create references to the input fields so I don't have to make
a call to jQuery again. Later on we will use these references to retrieve the
values the user entered.
Before we go any further the initialization process needs to be created. We
have defined our view but never used it. Open
app/assets/javascripts/application.js. Edit the file to include the following:
//= require jquery
//= require jquery_ujs
//= require underscore
//= require backbone
//= require backbone_rails_sync
//= require_tree ./models
//= require_tree ./views

// Rails CSRF Protection
$(document).ajaxSend(function (e, xhr, options) {
  var token = $("meta[name='csrf-token']").attr("content");
  xhr.setRequestHeader("X-CSRF-Token", token);
});

// Underscore.js Template Settings
_.templateSettings = {
    interpolate: /\{\{\=(.+?)\}\}/g,
    evaluate: /\{\{(.+?)\}\}/g
};

// Routing Based on URL
Router = {
  '/signup': function () { new SignupView(); },

  route: function (path) {
    _.each(Router, function(callback, route) {
      if (!_.isRegExp(route)) {
        route = Backbone.Router.prototype._routeToRegExp(route);
      }
      if(route.test(path)) {
        var args = Backbone.Router.prototype._extractParameters(route, path);
        callback.apply(this, args);
      }
    });
  }
};

// Start the app when the page has loaded.
$(document).ready(function () {
  Router.route(window.location.pathname);
});
The CSRF Protection
is a security feature in Rails. This function just tells jQuery to include the
CSRF token that is rendered in the head of the HTML doc whenever an AJAX)
request is made. If this isn't included the request will throw an error.
By default Underscore.js uses the <% %> syntax for evaluation and <%= %>
for interpolating. This gets confusing when working with Rails as it uses the
same templating syntax. This changes Underscore.js to use the {{ }} and
{{= }} syntax.
The Router is a custom router that just takes routes a URL to a given
callback.
Now lets create our User model for Backbone.js that will be used to create
a user from what is entered in the signup form. Open
app/assets/javascripts/models/user.js.
$ mate app/assets/javascripts/models/user.js
And add the model definition.
var User = Backbone.Model.extend({
  url: '/account',
  paramRoot: 'user'
});
The url is the route that should be used for the model. For a model called
Property the URL would probably be /properties.
The paramRoot is part of the Rails extension to Backbone.js. When creating
or updating a model Rails typically expects the parameters to be scoped. So
any parameters for the user sent to Rails will be scoped under the user
name.
Thats all that is needed to start creating user accounts for the model. Lets now go back to the view and create a user when the submit button is clicked.
Open the app/assets/javascripts/views/signupView.js. Add the events,
attributes, and createUser properties to the view:
SignupView = Backbone.View.extend({
  el: '#signup-view',
  events: { 'submit form':   'createUser' },

  attributes: function () {
    return {
      name: this.nameField.val(),
      email: this.emailField.val(),
      password: this.passwordField.val(),
      password_confirmation: this.passwordConfirmationField.val()
    };
  },

  createUser: function () {
    if (this.submitButton.hasClass('disabled') && this.form.data('user-created') !== true) {
      return false;
    } else {
      this.submitButton.addClass('disabled');
    }

    var self = this,
        user = new User(this.attributes());
    user.save(null, {
      error: function (originalModel, resp, options) {
        self.$el.find('input').removeClass('error');
        var errors = JSON.parse(resp.responseText).errors;
        _.each(errors, function(value, key) {
          self.$el.find('input[name=' + key +']').addClass('error');
        });
        self.submitButton.removeClass('disabled');
      },
      success: function () {
        self.form.data('user-created', true);
        document.location.href = '/';
      }
    });

    return (this.form.data('user-created') === true);
  },

  initialize: function () {
    this.form = this.$el.find('form');
    this.nameField = this.$el.find('input[name=name]');
    this.emailField = this.$el.find('input[name=email]');
    this.passwordField = this.$el.find('input[name=password]');
    this.passwordConfirmationField = this.$el.find('input[name=password_confirmation]');
    this.submitButton = this.$el.find('input[type=submit]');
  },

});
The events property is essentially a hash which binds the given events
(the key) to the the specified function. In this case the event is a submit
on the form element. When that event is fired, createUser will be called.
The createUser function at first disables the button so that if the user
hits it again while the browser won't send the a second request trying to
create the same user again. If the button is disabled, just return and do
nothing, otherwise continue to create the user. The line
new User(this.attributes()); creates a new user model that has the
attributes specified in the attributes function. After that user.save is
called. The function is given two callbacks, error and success. On
error the server returns the fields that have errors and simply adds a the
.error class to the input field. In the CSS you could then highlight the
field in red so the user is aware of what the error is. On success the user
gets redirect to the root of the application.
Lets update the CSS to highlight a input.error field in red. Open
app/assets/stylesheets/users.css.scss. Add the following line under the #signup-view
input.error { border: 2px solid red; }
Go to http://localhost:3000/signup and try submitting the form. The fields
with errors should now be highlighted.

Go ahead and fill out the form. If it was successful you should see the standard welcome to Rails page.
Creating a user is now completed. Developing the login form is next.
First open the ApplicationController in app/controllers/application_controller.rb and
add the following helper methods that will support user sessions.
class ApplicationController < ActionController::Base
  protect_from_forgery

  helper_method :current_user

  private

  def require_user
    return if current_user

    respond_to do |format|
      format.html { redirect_to login_path }
      format.all  { render :text => 'unauthorized', :status => :unauthorized }
    end
  end

  def current_user
    return @current_user if @current_user

    if session[:user_id]
      @current_user = User.find(session[:user_id])
    elsif (header = request.headers['Authorization'].to_s.sub('Basic ','')) != ''
      header = Base64.decode64(header).split(':')
      username = header.shift
      password = header.join(':')
      @current_user = User.authenticate(username, password)
    end
  end

  def create_user_session(user)
    session[:user_id] = user.id
  end

  def destroy_user_session
    session[:user_id] = nil
  end

end
The require_user can be used in a before_filter
to only allow access to logged in users, current_user returns the current
logged in user, create_user_session will create a session for a given user,
and destroy_user_session will log out a user.
Now create a SessionsController that will manage the creation of user
sessions.
$ rails generate controller sessions
$ mate app/controllers/sessions_controller.rb
Add the create and destroy actions which will be used for logging in and
logging out.
class SessionsController < ApplicationController

  respond_to :html, :json

  def create
    @user = User.authenticate(params[:email], params[:password])

    if @user
      create_user_session(@user)
      respond_with @user, :location => '/', :notice => "Login succesful."
    else
      respond_to do |format|
        format.html { render 'new' }
        format.json { render :json => {:error => "Invalid email or password."} }
      end
    end
  end

  def destroy
    destroy_user_session
    redirect_to '/', :notice => "Logged out."
  end

end
The User.authenticate method hasn't been defined yet. Open up the user model
for Rails and add it.
class User < ActiveRecord::Base

  attr_accessor :password
  attr_protected :password_digest

  validates :name, :presence => true
  validates :email, :presence => true, :uniqueness => true, :email => true
  validates :password, :presence => true, :confirmation => true
  validates :password_confirmation, :presence => { :if => :password }
  validates :phone, :format => { :allow_nil => true, :with => /^[\(\)0-9\- \+\.]{10,20}\s*[extension\.]{0,9}\s*[0-9]{0,5}$/i }

  def self.authenticate(email, pass)
    user = where(:email => email).first
    user && BCrypt::Password.new(user.password_digest) == pass ? user : nil
  end

  def password=(pass)
    return if pass.blank?
    @password = pass
    self.password_digest = BCrypt::Password.create(pass)
  end

end
Don't forget about the routes in config/routes.rb.
MLS::Application.routes.draw do

  match 'login'  => 'sessions#new', :via => :get
  match 'logout' => 'sessions#destroy', :via => [:get, :delete]
  match 'signup' => 'users#new', :via => :get

  resource :session, :only => [:new, :create, :destroy]
  resource :account, :controller => 'users', :except => [:index, :destroy, :show, :edit]

end
Now back to the views and Backbone.js. Create the app/views/sessions/new.html.erb
file and open it up for editing.
$ mate app/views/sessions/new.html.erb
Create the view.
<div id='login-view'>
  <aside>
    <h1>42Floors MLS</h1>
  </aside>
  <%= form_tag session_path do %>
    <%= label_tag :email %>
    <%= text_field_tag :email, params[:email] %>

    <%= label_tag :password %>
    <%= password_field_tag :password %>

    <%= submit_tag "Log In" %>
  <% end %>
  <div class='clear'></div>
</div>
Add some styling in app/assets/stylesheets/sessions.css.scss.
#login-view {
  width: 670px;
  position: relative;
  margin: 100px auto;
  background: #FFF;
  -webkit-border-radius: 5px;
  -moz-border-radius: 5px;
  -ms-border-radius: 5px;
  -o-border-radius: 5px;
  border-radius: 5px;
  -webkit-box-shadow: 0px 1px 5px rgba(0, 0, 0, 0.2);
  -moz-box-shadow: 0px 1px 5px rgba(0, 0, 0, 0.2);
  box-shadow: 0px 1px 5px rgba(0, 0, 0, 0.2);
  background: #FFF;

  aside {
    -moz-box-sizing:    border-box;
    -webkit-box-sizing: border-box;
    box-sizing:        border-box;
    width: 270px;
    float: left;
    margin: 0;
    text-align: center;
    padding: 75px 0;
    margin-right: 15px;
  }

  form {
    -moz-box-sizing:    border-box;
    -webkit-box-sizing: border-box;
    box-sizing:        border-box;
    margin: 0;
    width: 385px;
    float: left;
    padding: 30px 30px 30px 45px;
    border-left: 1px solid #D8DEE2;

    label { width: 310px; display: inline-block; margin-top: 10px; }
    input { margin-bottom: 10px; }
    input[type=text], input[type=password] { width: 300px }
    input[type=submit] {
      float: right;
      margin-top: 10px;
      display: block;
    }
  }
}
Now the Backbone.js side of things. Create and open app/assets/javascripts/views/loginView.js.
$ mate app/assets/javascripts/views/loginView.js
Define the view.
LoginView = Backbone.View.extend({
  el: '#login-view',
  events: { 'submit form':   'authorize' },

  authorize: function () {
    if (this.submitButton.hasClass('disabled') && !(this.form.data('user-authorized') === true)) {
      return false;
    } else {
      this.submitButton.addClass('disabled');
    }

    var self = this,
        attrs = {
          email: this.emailField.val(),
          password: this.passwordField.val()
        };
    User.authorize(attrs, function (err, user) {
      if (err) { self.loginFailure(); }
      else { self.loginSuccess(); }
    });
    return (this.form.data('user-authorized') === true);
  },

  loginSuccess: function () {
    this.form.data('user-authorized', true);
    this.form.submit();
  },

  loginFailure: function () {
    this.$el.animate({left: '-=20'}, 100);
    this.$el.animate({left: '+=40'}, 100);
    this.$el.animate({left: '-=40'}, 100);
    this.$el.animate({left: '+=40'}, 100);
    this.$el.animate({left: '-=20'}, 100);
    this.emailField.focus();
    this.submitButton.removeClass('disabled');
  },

  initialize: function () {
    this.form = this.$el.find('form');
    this.emailField = this.$el.find('input[name=email]');
    this.passwordField = this.$el.find('input[name=password]');
    this.submitButton = this.$el.find('input[type=submit]');
  },

});
The authorize function will try to authenticate the user with the Rails app.
If it succeeds the user will be redirected to a different page. If it does not
succeed the login form will shake and require the user to try and authenticate
again.
Update the Backbone.js routes in app/assets/javascripts/application.js to
initialize the view.
//= require jquery
//= require jquery_ujs
//= require underscore
//= require backbone
//= require backbone_rails_sync
//= require_tree ./models
//= require_tree ./views

$(document).ajaxSend(function (e, xhr, options) {
  var token = $("meta[name='csrf-token']").attr("content");
  xhr.setRequestHeader("X-CSRF-Token", token);
});

_.templateSettings = {
    interpolate: /\{\{\=(.+?)\}\}/g,
    evaluate: /\{\{(.+?)\}\}/g
};

Router = {
  '/signup': function () { new SignupView(); },
  '/login': function () { new LoginView(); },

  route: function (path) {
    _.each(Router, function(callback, route) {
      if (!_.isRegExp(route)) {
        route = Backbone.Router.prototype._routeToRegExp(route);
      }
      if(route.test(path)) {
        var args = Backbone.Router.prototype._extractParameters(route, path);
        callback.apply(this, args);
      }
    });
  }
};

$(document).ready(function () {
  Router.route(window.location.pathname);
});
Now if you try logging in, it still won't work. The User.authorize for the
Backbone.js model hasn't been defined yet, so the browser will just throw an
error and then submit the form. Open up app/assets/javascripts/models/user.js
and add the function definition.
var User = Backbone.Model.extend({
  url: '/account',
  paramRoot: 'user',

  authenticate: function (password, callback) {
    var self = this;

    $.ajax({
      type: 'POST',
      url:  '/session.json',
      data: {
        email: this.get('email'),
        password: password
      },
      success: function (data) {
        if (data.error) {
          callback.call(this, data.error, self);
        } else {
          self.set(data);
          callback.call(this, null, self);
        }
      }
    });
  },

});

User.authorize = function (attrs, callback) {
  var user = new User({email: attrs.email});
  user.authenticate(attrs.password, callback);
};
The authenticate method will submit an AJAX) request and ensure that the
credentials are correct. The User.authorize is just a helper method so
it isn't necessary to directly instantiate a new User model.
Now go to http://localhost:3000/login in a browser. It should look like this.

Hit the submit button on the form. The form should shake letting you know that the credentials were incorrect.
Sign up for the app at http://localhost:3000/signup. Then go to
http://localhost:3001/login. If you enter the correct credentials it will
let you through.
This is only one of the ways to do authentication with Rails.
One downside to this approach is that after the user is authenticated the same request is sent again to the server will redirect to the home page of the app.
A different approach would be to render the view with Backbone.js on the client side. This can get sticky because the application has state. If the website doesn't need to be indexed by Google, Bing, or Yahoo it works fine. If it does then the server can render the view with all the data and the app can be support multiple entry points based on the URL. This can also get complicated as every page can either be rendered on the client side (which has state) or the server (which does not have state) and both need to end up outputting the same thing. I haven't found a good way to deal with this yet.
To learn more about Backbone.js, visit the docs. Peepcode also has some great screencasts. They don't use the most recent version of Backbone.js, but its still full of great information. Some folks have even started writing a free eBook. Check it out for a deeper dive into Backbone.js.
A quick note about security. By default Rails uses cookies to store session data. The user will be able to see what is stored in the cookie. However Rails does sign the cookie to prevent the user from tampering with it.
HTTPS should also be used on the login and
signup pages. The downside of this is that you may run into issues when
caching parts of the page. Ideally we would just make the AJAX) request when
the users submits the form over HTTPS. The force_ssl feature in Rails
can be used to force an action to use HTTPS.